Users
In the Users section, you can manage all the users of the system: dispatchers, logisticians, drivers, administrators, and other employees. Here, you can see a list of all users and set their access to the system.

Each row in the Users table represents a separate user. You'll see the following details:
-
Username — the login name used to access the system
-
Email — work email address
-
Full Name — the user's full name
-
Phone — contact number
-
Role — for example, Logistician, Dispatcher, Administrator
-
Driver — a marker indicating if the account is associated with a driver
User actions
Above the table, there are several buttons for managing users:
-
Add — create a new user by setting their username, password, contact information, and access rights
-
Edit — edit the details of a selected user
-
Delete — delete a user's account
-
Download — export user information to an Excel file
-
Upload — upload user information from a pre-prepared file
-
Update drivers — update data for driver accounts
-
Show drivers — check this box to see driver accounts in the list as well
How to add a user
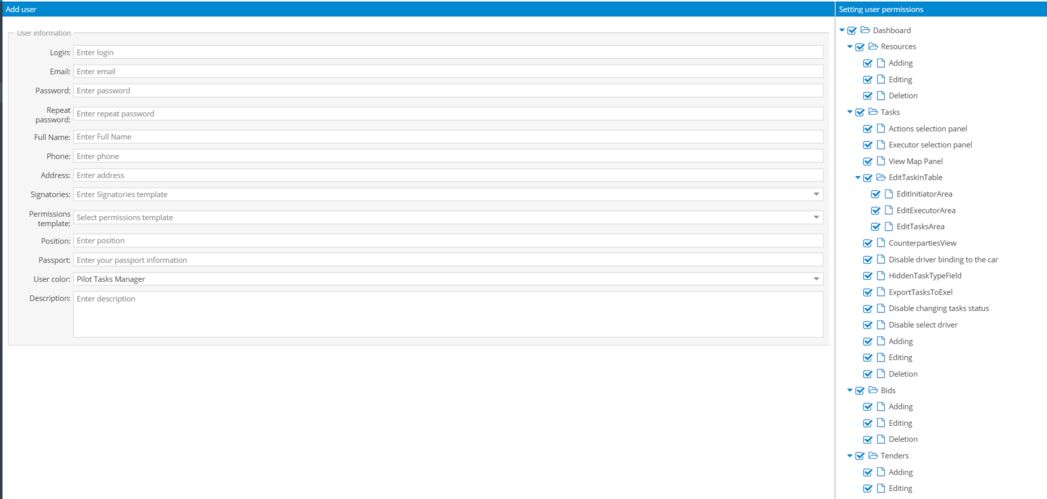
1. Click on the Add button at the top of the screen to open the new user card

2. Fill in the main information:

-
Login — the name under which the user will log in to the system
-
Email — the work email for notifications and access
-
Password — create a password and confirm it
-
Full name — the user's full name
-
Phone — contact number
-
Address — work address, if needed
-
Signatories — select the signatory template if this user will sign documents
-
Permission templates — choose a predefined set of permissions for the user (e.g., Administrator, Logistician, Driver)
-
Position — specify the position (logistician, driver, dispatcher, etc.)
-
Passport — enter passport details if required
-
User Color — choose a color to highlight this user in the system
-
Description — add comments or notes3. Set permissionsOn the right side of the user card, there is a block with checkboxes where you can set which actions are allowed for this user. Check the relevant boxes to activate permissions for this account.
 4. Save the user cardOnce all the data is filled in and permissions are set, click Sand. The new user will appear in the list and will be able to log in using the provided username and password.

If you change your mind, click Cancel, and the changes will not be saved.
How to edit a user
To edit a user's details, select them from the list and click the Edit button at the top of the table. A user card will open where you can make the necessary changes. You can also double-click the row with the user, and the user card will open automatically.

After editing the user card, click Save to save the changes.

Watch the video to learn how to manage users and signatories.
|